Growing Sprouts in a Mason Jar
April 8, 2012
Our local organic market sells all kinds of sprouts – broccoli sprouts, alfalfa sprouts, bean sprouts, and more. Sprouts are incredibly healthy and high in nutrition. They’re also darn expensive. But guess what? You can grow your own sprouts in a mason jar. It’s cheap, fast, super simple, fun for the kids, and they’re the freshest, crunchiest sprouts you’ll find anywhere. Here’s how…
Step 1. Pick Your Sprouts. Sprouts are simply germinated seeds, beans, peas or lentils. Pick up a bag of alfalfa seeds at your garden shop or farm supply store, or grab some dried lentils, garbanzo beans, or my personal favorite…mung beans, which are commonly used in asian cooking.
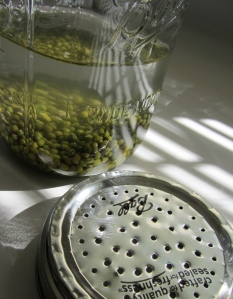
Step 2. Prepare Your Jar. Use a 1 quart mason jar and lid. Drill holes in the lid (I used a drill press) so it looks like a sieve. Add 4 tbsp of your sprouting medium into the jar and cover about 3-4 inches with water.
…
…
Step 3. Soak Your Seeds. Allow to set 6-8 hours or overnight, then drain the soaked seeds, rinse thoroughly then drain again.
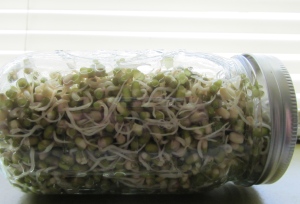
Step 4. Set it in a Sunny Place. Set the jar horizontally on its side next to a sunny window. This allows the seeds to spread out a bit.
Step 5. Rinse and Drain Morning and Night. Rinse and drain the seeds every morning and every evening, returning the jar back on its side in front of the window.
…
…
Within 2 days you’ll see the seeds begin to sprout. Within 5 days, you’ll have a jar full of spouts.
Step 6. Eat your sprouts. Store your sprouts in an air tight container with a dry towel to absorb the moisture. This allows the sprouts to stay fresher longer. Keep them refrigerated.
That’s all there is to it! Fresh home grown sprouts for the whole family! For more information, including an online source for sprouting mediums and demonstrations of other sprouting methods, check out this video from mountainroseherbs.
Happy sprouting!!!
…
…
Roasted Cheese Stuffed Chili Peppers
August 7, 2011
We recently had the cheese stuffed banana peppers appetizer at Frederick’s new Roast House Pub restaurant in Frederick. Two of our favorite things – soft roasted hot peppers and cheese. The hubster and I looked at each other and said “we can make these”. And wouldn’t you know? Our banana peppers and chilies just happen to be ripening in the garden. Perfect timing for our own roasted cheese stuffed chili fest.
Here’s what we came up with…
Roasted Cheese Stuffed Chilies
Preheat oven at 375 degrees.
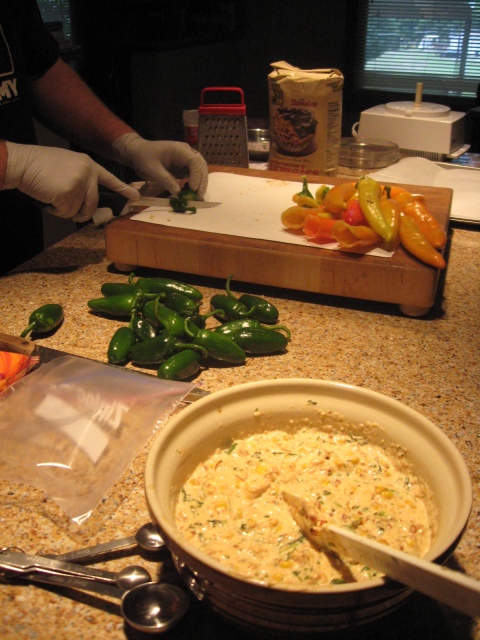
Prepare 12 fresh banana peppers or long chilies, or 24 jalapenos by slicing the tops off to fill from the top, or slice them down the side to fill from the sides.
Saute the following in a skillet until caramelized:
- ½ medium onion, sliced
- 4 cloves garlic, chopped
- 1 tsp. olive oil
Add the caramelized onion mixture to the following ingredients in a food processor and blend smooth.
- 4 oz cream cheese
- ½ cup Monterey jack cheese, shredded
- ½ cup sharp cheddar cheese, shredded
- 2 tsp. chipotle
Stir in the following ingredients with a spatula or spoon:
- 3 oz. crumbled bacon (we used the ready to eat crumbled bacon in a bag)
- ½ cup canned corn, sautéed in the skillet
- ¼ cup chopped cilantro
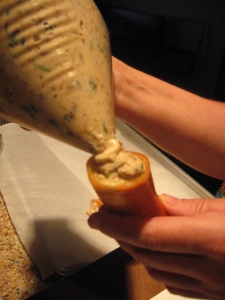
– Add the filling to a Ziploc bag. Press air out the top and zip closed.
– Cut one of the bottom corners of the bag to create a ½ inch hole.
– Twist the top of the bag and press out the filling into the peppers, either from the top (add enough filling so the top will stick when placed back on the pepper) or along the sides and insert a toothpick to keep them closed.
– Set the stuffed chilies upright in a chili roaster rack or lay them on their sides on parchment.
– Roast chilies for 40 minutes or until they’re soft and cheese is melted and crusty.
Variations
Can I just say “holy bajeebers” these things are GOOD! I personally would not change a single thing on this recipe; however, that would defeat the purpose of this blog, so here are a few ideas for variations.
Smoked vs. Baked. They’re fantastic roasted in the oven, but just imagine them infused with smoked flavor on the smoker. Everything is better when it’s cooked outside, right?
Bacon or No Bacon? It’s hard to say “no” to bacon, but you can always swap it out for crab or shrimp, sausage, chorizo, chicken, ham or pork. Or don’t add any meat at all.
Dip it. Seriously, the filling alone would make a fantastic baked queso dip. A guaranteed hit at any party.
Stuff More Than Peppers. The filling could also be used to stuff just about anything that’s stuffable – peppers, tomatoes, zucchini, zucchini flowers, enchiladas, chili rellenos.
Mac and Cheese. Stir it into some pasta and make a special baked mac and cheese. Yum!
Double the recipe and it’s a party. These Roasted Cheese Stuffed Chili Peppers are easy to make in volume, plus the stuffed peppers and the leftover filling will freeze well for later. So start picking those garden fresh peppers and whip up a batch for your next social gathering, or in our case, a casual weekend meal for two. Enjoy!
The best surprises come from happy accidents.
Italian Baked Tomato, Corn and Cheese Tortellini
August 5, 2011
Another garden fresh recipe that we only seem to make when the cherry tomatoes begin to ripen. Our Italian Baked Tomato and Corn Cheese Tortellini is fresh, simple, delicious and satisfying. It’s perfect for brunch, lunch or dinner; meatless mondays; vegetarian visitors (assuming they eat cheese); or just a nice easy meal for two paired with a high end beverage (we like beer) and a fresh side salad. As with most pasta dishes, the leftovers are just as good the next day, and of course fresh tomatoes, basil and garlic make all the difference.
Italian Baked Tomato, Corn and Cheese Tortellini
Ingredients
- 1/2 cup fresh basil, chopped
- 4-6 cloves of fresh garlic, minced
- 2 tbsp olive oil
- 1/2 tsp salt
- 3 cups cheese tortellini, cooked and drained
- 1-1/2 cups cherry tomatoes, halved longways
- 2/3 cup canned corn (we like Del Monte’s Summer Crisp)
- 3/4 cup white cheddar cheese, shredded
Instructions
- Preheat the oven to 375 degrees F.
- In a large bowl, combine the basil, garlic, olive oil and salt.
- Add the tortellini, tomatoes, corn and half of the cheese. Gently toss everything together.
- Pour the mixture into a 9×13 casserole dish.
- Sprinkle the remaining cheese evenly over top.
- Bake uncovered for 20-25 minutes, until cheese is browned.
Serves 4-6.
Variations
More veggies please. You can go crazy with the veggies in this dish. Sauteed mushrooms, roasted zucchini, eggplant, red pepper, asparagus, artichoke hearts, black olives, sun dried tomatoes, peas, and the list goes on and on. You can even add tomato sauce, top with cheese and bake it like a lasagna.
Cheesing it up. Swapping cheeses is a great way to add some really interesting flavors to this dish. Try salty feta, earthy goat cheese, smoked mozzerella, parmesan, gruyere, asiago, monterey jack, colby, or swiss.
Meatless no more. Add some heartiness with chopped or cubed ham, shredded chicken, ground italian sausage or lamb, kielbasa, or chorizo. Or lighten it up with fresh shrimp, clams, calamari, bay scallops, or even anchovies.
Feeling herbaceous? Add chopped chives, fresh flat leaf parsley, oregano, tarragon, or some different types of basil. Or how about mint leaves with ground lamb and sauteed eggplant?
Don’t like tortellini? Try penne, rigatoni, rotini, fusili, gnocchi, or other types of pasta or dumplings.
Just keep a bag of frozen tortellini around, and throw this recipe or a variation of this recipe together with whatever you have in the fridge or cupboards. It’s a great simple tasty dinner in a snap.
The best surprises come from happy accidents!
Newbies with Green Intentions
August 2, 2011
The hubster and I have done our share of do-gooder attempts at helping the environment. We have the reusable shopping bags in every car, our thermostat is set on a timer, we grow a fairly large organic garden, we foster rescue guinea pigs, and we recycle. Bottom line – we do respect animals, people, and the environment. But consistency is key, and we have a long way to go before we earn our green badges.
However, we’ve been hearing more and more disturbing (but not new) information about food production companies and the extent of their harmful and deceptive practices in terms of destruction to the environment; inhumane treatment toward animals and people; ruthless legal practices to monopolize the industry and put small farmers out of work; and their monetary control and power over the federal policy and food monitoring. For some reason this time it hit a nerve.
We asked ourselves some simple questions. Where DOES our food come from? How IS it produced? Humanely? Naturally? Are we contributing financially to the unethical companies who have respect for nothing except the almighty dollar? I admit, we never paid much attention to it, until now. So we decided its time to make some healthy and ethical lifestyle changes, starting with the switch to organic.
We’re fortunate to live in one of the largest farming counties in Maryland. We have a half dozen farmers markets to choose from; a great co-op market that sells all local and organic foods; and my company is located next to one of the finest grass fed beef farms on the east coast. We have no excuses.
Is organic more expensive? Not necessarily, although I have passed a few kidney stones over some prices since starting this venture. In fact, we discovered that a number of our weekly staples are organic and we didn’t even know it. It really boils down to what you’re buying and where. The good news is that organic options are sold in virtually every grocery store in America (look for the USDA symbol), and a little internet research tells us everything we ever wanted to know about the companies producing our food. We’re thinking before we buy and we are in control of choosing what businesses we support, whether they be local farmers and businesses or large ethical companies who work for the greater good. What a concept!
I realize we’re way behind many who’ve been waving their hippie flags for well over a decade and made it easy for the rest of us. But it’s never too late to do the right thing. The green movement is in motion, and going organic and local as much as possible is our first step in the right direction. Who knows whether our mini contributions will make a difference or not. We’re doing it because it makes us feel good. That’s exactly what’s needed to turn the system around and make the world a better place for everyone – support from consumers like us…one household at a time, demanding healthier food, humane practices for workers and animals, and respect for the environment.
Black Bean Mango Salsa
June 19, 2011
Black bean mango salsa is packed with flavor, color and healthy ingredients. A great sweet and savory condiment with burgers, fish, pork or chicken, or vegetarian dishes. Of course, you can also serve it with tortilla chips or pita chips. Its super easy, and the variations can go in any direction.
Black Bean Mango Salsa
Ingredients
2 large mangos, cut in small cubes
1 14-oz can black beans, rinsed and drained
1 large red pepper, chopped
1 bunch (~5) green onions, sliced
1/3 cup chopped cilantro
Juice from 1/2 lime
1/2 tbsp honey
1/2 – 1 tsp fruity habanero hot sauce
Salt to taste
Directions
- Add all ingredients in a large bowl and gently combine.
- Let set for about 20 minutes in fridge to let the flavors blend.
Variations
- This recipe can go spicy, sweet, sour, asian, hawaiian, indian, mediterranean or caribbean with just a few small tweaks.
- Spice it up with fresh ginger, cinnamon or nutmeg.
- Try some different fruits, like peaches, apricots, papaya, persimmons, guava or passion fruit.
- Fruity heat works great for this salsa. Experiment with different hot sauces, add fresh jalapeño, habaneros, serranos or thai chiles; or add some smokey heat with chipotle.
- In place of honey you can use regular sugar, brown sugar, agave nectar, or fruit preserves. Perhaps add a little fruity schnapps.
- Replace the beans with black eyes peas, kidney beans, chick peas, cannelloni beans, or green peas.
- Make it a side dish by adding some grains – quinoa, couscous, barley, bulgar, or rice would turn this into a fantastic cold salad or warmed side dish.
- Throw in some chopped SPAM, ahi tuna, chopped pork tenderloin, chicken, tofu, or seafood.
- Throw it in salads, or just keep it around for some healthy snacking.
A great accompaniment for any cookout, this salsa has tons of potential and is a standard summer favorite in our house. Enjoy!
The best surprises come from happy accidents.

